Skip to content
  • Home
  • About Us
  • Services
    • Custom Orthotics
    • Heel Pain Treatment
    • Ingrown Toenail Treatment
    • Plantar Wart Treatment
    • Diabetes Foot Assessment
  • Blog
  • FAQ’s
  • Contact
Book Online
Therapy, Work Injury

Lacing techniques for different foot shapes

August 21, 2023 Tim Foran No comments yet
Shoe lacing diagram showing the heel-lock technique to prevent heel slipping

The universal shoe tying technique of a rabbit perpetually running around a tree works great when you’re 5. However, as most runners have experienced, shoes can be a source of discomfort and even sometimes pain.

Changing the way you lace up your kicks can completely change the way you feel about your running shoes. We have listed some of the most common shoe issues, and the solutions in lace form. Read on and your arches, heels and toes will thank you.

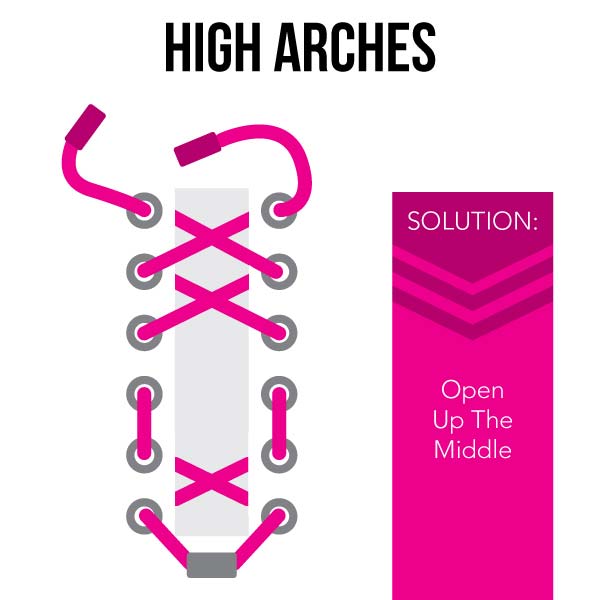
Start by lacing your shoe at the bottom like you normally would, evening up the laces through the bottom eyelets. Cross the laces and thread them to the second eyelets normally. Now, here is the crucial part – take the laces directly up the shoe (not crossing the tongue) into the next row of eyelets, leaving an open area in the middle of the shoe. Just keep lacing crisscross style until you reach the top.

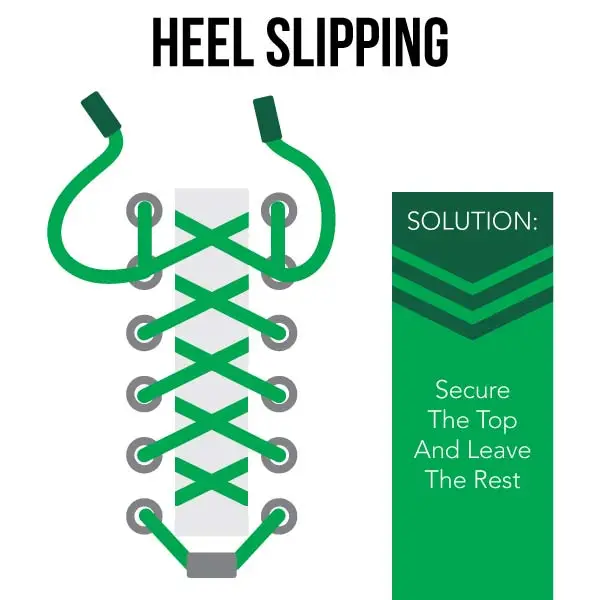
No one wants to feel like they are running on banana peels. This one is fairly straightforward as you lace your shoes normally until one eyelet remains on each side. Lace each side straight up the outside of the shoe into the last eyelet, leaving a loop on either side. Crisscross each lace across the shoe and pull it through the opposite loop and tie as normal. These loops help pull up the shoe material around your ankle to secure your heel in place without tightening the rest of your shoe differently.

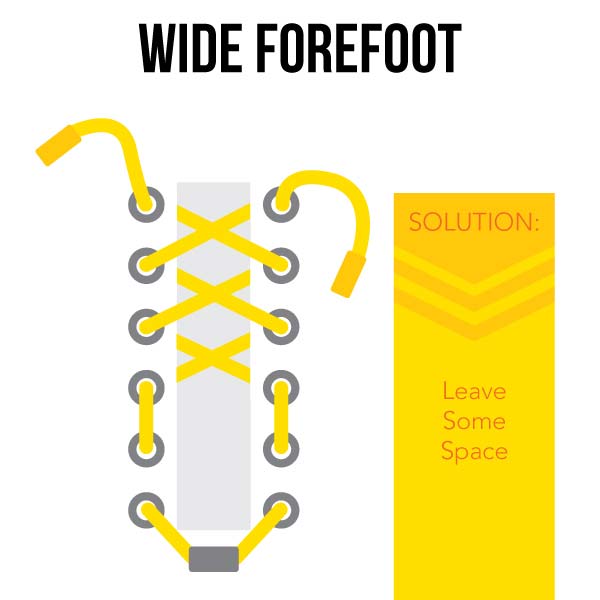
Get some air down there! This one is similar to what we did with High Arches, but placing the gap lower. Start by lacing your shoes evenly at the bottom, then start working up the outside. Lace each side into the first eyelet up the side of the shoe. Do this twice to the middle of the shoe to the third eyelet on each respective side. Then just lace up normally and your feet will have plenty of room to work with while you run.

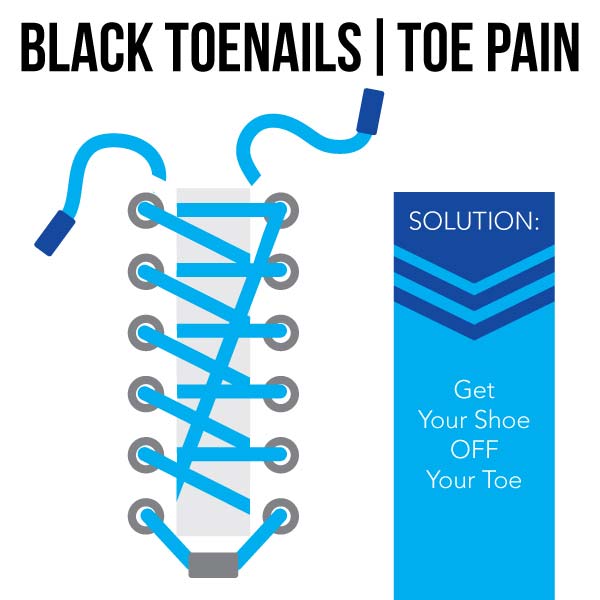
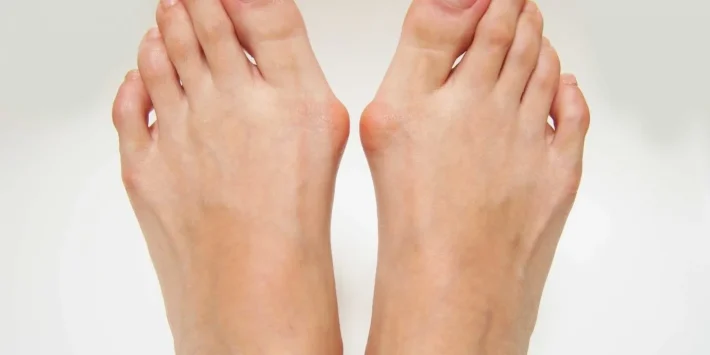
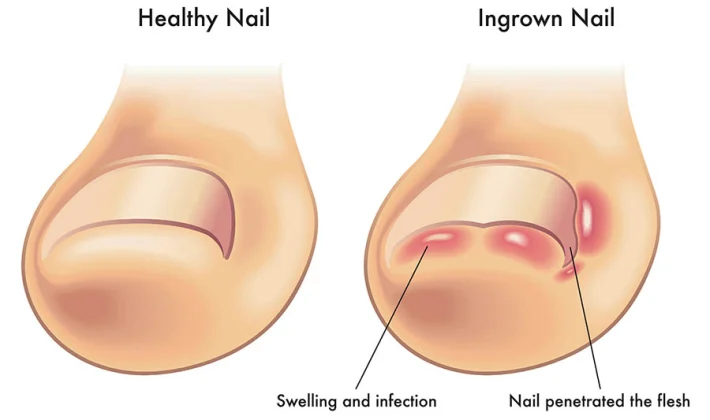
This is a common problem with an interesting technique to help your toes. Start by threading one side of your laces at the top of your shoe on the opposite side of your big toe. Make sure to leave enough lace to tie your shoes. Then take the lace down to the end of your shoe closest to your big toe to the bottom eyelet making a diagonal line. Now simply lace up your shoe with this single long lace normally in a zig zag fashion. You’ll notice now when tying each shoe that the bit of shoe above your big toe gets pulled away from your nail while allowing the rest of your shoe to be tied up tight.

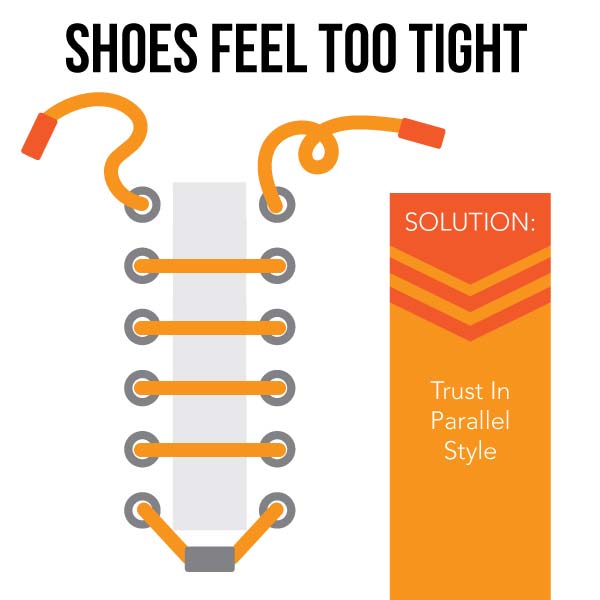
This one looks simple, but can be a bit tricky. Start by lacing the first two eyelets on the same side on the big toe side of your shoe. From here we are going to follow a pattern. Take the lower lace and cross it to the other bottom eyelet and put the lace down through it. Take that same lace, skip the second eyelet and thread it up through the third eyelet, then cross it over the tongue and down through the opposite side eyelet. Follow this pattern up the shoe. Do the same pattern with the other side of the lace on the remaining eyelets. You’ll notice at the top that one of the laces will go right in perfectly with the top eyelet and the other is a tad short. Just pull up the remaining lace along the same side of the shoe to the top eyelet and you will be all done. Avoiding the standard crisscross pattern in this style allows the top of the foot to have more room, giving you much more comfort while still getting support.

  • how to lace shoes
  • podiatrist
  • podiatry
  • runner’s guide
  • running shoes
  • running tips
  • shoe fitting
  • shoe lacing
Tim Foran

Post navigation

Next

Search

Categories

  • Conditions (11)
  • Exercises (3)
  • Sporting (5)
  • Therapy (10)
  • Work Injury (4)

Recent posts

  • Medical illustration comparing a healthy toenail with an ingrown toenail showing swelling, infection and nail penetrating the flesh
    Ingrown Toenail Treatment in Newcastle — A Podiatrist’s Guide to Getting Lasting Relief
  • Anatomical diagram of the plantar plate showing collateral ligaments, flexor tendons and plantar fascia, with a comparison of a healthy plantar plate and an elongated, torn plantar plate at the metatarsophalangeal joint.
    Plantar Plate Tears — Why This Forefoot Injury Is So Often Misdiagnosed (A Newcastle Podiatrist’s Guide)
  • Side view of a flat foot showing a collapsed medial arch with pain highlighted in red along the inner arch — the typical appearance of posterior tibial tendon dysfunction (PTTD)
    Posterior Tibial Tendon Dysfunction (PTTD) — A Newcastle Podiatrist’s Guide to Adult Flatfoot

Tags

Achilles tendinopathy adult acquired flatfoot ankle sprain arch pain ball of foot pain crossover toe custom orthotics east coast podiatry clinic foot fracture foot injury foot pain Newcastle forefoot pain heel pain heel pain Newcastle ingrown toenail ingrown toenail Newcastle ingrown toenail treatment inner ankle pain Lisfranc injury metatarsalgia midfoot injury Morton's neuroma Morton's neuroma misdiagnosis nail surgery Newcastle podiatrist partial nail avulsion plantar fasciitis plantar fasciopathy plantar fasciosis plantar plate plantar plate tear PNA podiatrist podiatry posterior tibial tendon dysfunction PTTD rugby league injury runner's knee second MTPJ second MTPJ synovitis shin splints sports injury Newcastle sports podiatry synovitis toenail infection

Related posts

Medical illustration comparing a healthy toenail with an ingrown toenail showing swelling, infection and nail penetrating the flesh
Conditions, Therapy

Ingrown Toenail Treatment in Newcastle — A Podiatrist’s Guide to Getting Lasting Relief

June 8, 2026 Tim Foran No comments yet

Got a toenail that’s red, swollen, and agony to touch — or that keeps flaring up no matter what you try? Ingrown toenails are one of the most common conditions we treat at East Coast Podiatry Clinic, and also one of the most incorrectly treated at home. Newcastle podiatrist Tim Foran explains why home remedies fail, what the procedure actually involves, and how to make sure it doesn’t come back.

Foot showing red highlighted area indicating ankle pain or injury
Conditions, Exercises, Sporting, Therapy, Work Injury

Tendonitis in the Feet: A Complete Guide to Causes, Treatment & Recovery

February 1, 2026 Tim Foran No comments yet

Tendonitis causes pain, stiffness and swelling in the tendons — most commonly the Achilles — and is often the result of overuse, poor footwear, or training on hard surfaces. Newcastle podiatrist Tim Foran explains the causes, treatment options, and five practical tips to speed up recovery and prevent it coming back.

Get in touch

  • Shop 2/1 Glebe Street, Kahibah
  • (02) 4942 2550
  • info@myfeet.net.au
Book an appointment

Services

  • Custom 3D Printed Orthotics
  • Heel Pain Treatment
  • Ingrown Toenail Treatment
  • Plantar Wart Treatment
  • Diabetes Foot Assessment

Hours

Monday 8:00 AM - 5:00 PM
Tuesday 8:00 AM - 4:00 PM
Wednesday 8:00 AM - 4:00 PM
Thursday 8:00 AM - 4:00 PM
Friday 8:00 AM - 2:00 PM
Saturday CLOSED
Sunday CLOSED

Find us

Open your preferred maps app for directions to our clinic.

Google Maps Opens in Google Maps ↗ Apple Maps Opens in Apple Maps ↗ Waze Opens in Waze ↗
📍 Shop 2/1 Glebe St, Kahibah NSW 2290